Getting Started With Your New Prompter
Learn how to use your BLACK BOX Prompter properly so you’ll be ready at your next gig.
Step 1: Connect Keyboard, Connect WiFi & Update Software
Your very first step is to connect to your keyboard and trackpad using the USB receiver provided inside the box (refer to video).
Next, connect to WiFi so you can download the latest software update (very important).
Tip: Use the keyboard so it’s easier to type in your network password.
GO! Customers: How to Assemble Your Portable Prompter
Co-founder Todd Keitel walks new GO! customers through the simple, step-by-step process of assembling the portable prompter so you can get performance-ready in minutes.
Learn how to securely attach the 22” monitor to the VESA mount, properly tighten the hardware, and adjust the monitor angle for optimal viewing performance.
Todd also mentions how the monitor can be set up in either vertical or horizontal orientation, giving you the flexibility to choose what works best for your workflow and shooting style.
Whether you’re unboxing your prompter for the first time or just want to double-check your setup, this quick walkthrough makes assembly easy and stress-free.
✅ Fast, beginner-friendly setup
✅ Adjustable angle for performance readiness
✅ Vertical or horizontal monitor orientation
✅ Pro tips straight from the BLACK BOX Prompter founder
How to Upload Lyrics & Charts (Text Files)
How to Manually Upoad Lyrics and/or Chord Charts from USB Thumb Drive
1. Use a basic text editor like Notepad (PC) or TextEdit (Mac). We recommend saving as plain text (.txt) files for the cleanest version*.
*Microsoft Word and Google Docs (.docx) files may also work but check for unwanted characters/symbols).
2. Copy lyrics you find online and paste them into your text editor and get it just the way you want to see it on your BLACK BOX Prompter.
a. add your line breaks
b. label your song sections in brackets (e.g. Chorus, Bridge, Solo, etc.). You can also add any notes inside brackets.
3. When saving:
a. Name the files the title of the song (Keep it clean: do NOT include things like artist name, extra notes, numbers, etc. in file name; avoid special characters).
b. Save them to your hard drive and then copy them over to the USB thumb drive in the “songs” folder.
c. Properly eject thumb drive from your computer/Mac (right click on thumb drive and choose “Eject”).
4. Insert into the side of your BLACK BOX Prompter and the software will recognize your USB thumb drive and start importing immediately. Done!
Remove your USB thumb drive from BOX when done and store in a safe place.
How to Create Set Lists on Your Prompter (No Thumb Drive Needed)
Learn how to create and edit set lists directly on your prompter without the need for a thumb drive.
In this video, you’ll learn how to build a set list from scratch using the internal Set List maker as well as editing existing set lists for future gigs.
The video walks you through the process, from naming your set list to adding and organizing songs, and finally saving and editing the lists.
Before you start, make sure:
- You already have songs loaded on your Prompter.
- Connect your keyboard with trackpad (or mouse).
- Your software is at least version 3.33.
Other method (using thumb drive)
1. Use Notepad (PC) or TextEdit (Mac), list out the song names in the order you wish to play them (only the song name – not the artist’s name). Song names must match perfectly word-for-word as what’s on your set list (though not case-sensitive).
***Please do NOT add numbers, file extensions, or extra info to your list of song titles. Every. Letter. Counts.***
2. To break up your list of songs into multiple sets, simply skip a line (every time you skip a line, it tells BLACK BOX Prompter to start a new set so you can easily see “Set 1”, “Set 2”, “Set 3”, etc.).
3. When saving your set list, be sure to:
a. Give it a friendly/recognizable name (We recommend including date and venue of your gig), E.g. “2024-11-14-GeorgesBar” (file extension should be a text-based file (i.e. must end in .txt, .docx, or .odt)
b. Do NOT use spaces, periods, or weird characters (no quotes, parentheses, question marks. etc.). Only acceptable characters other than letters/numbers are dashes (-), underscores (_), and brackets ( [ ] ).
c. Save it to your local hard drive first, then copy your set list files over to the “setlists” folder on your USB thumb drive (be sure file has .txt, .docx, or .odt extension).
4. Loading new Set List to your BLACK BOX Prompter:
a. Properly eject your thumb drive (right-click on the thumb drive and choose “Eject”)
b. Insert thumb drive into your BLACK BOX Prompter and it will immediately recognize it and you’ll see your new set list in your “View Set Lists” menu.
BEFORE YOUR GIG: Double-check all your lyrics/chord files are named properly, spelled correctly, and already loaded on your BOX so it perfectly matches the songs on your set list.
*** If your lyrics/chord file is not present or misspelled, then you will see an error on your BOX saying it can’t find the song. ***
How to Edit Songs Directly on your Prompter
You can edit songs (i.e. lyrics, chord charts in .txt, .docx, or .pdf format) directly on your BLACK BOX Prompter – no laptop or thumb drive needed!
Watch this video to adjust the colors in your text editor if it’s hard to read.
1. From Main Menu select:
“Songs | Set Lists” >
“Enable Song Editing” and enable it
2. Go up to “View EverySong”
3. Scroll to the song you’d like to edit and DOUBLE SELECT it with foot pedal
4. Plug in a USB keyboard
5. Edit song to your liking.
6. To save, press Ctrl-S (or Save button in top-right corner), and press Enter to overwrite current song.
7. Click the [X] in top-right to close window.
For Set Lists, it’s the same steps, except you’ll turn on Set List editing and then go to Set Lists to choose the Set List to update.
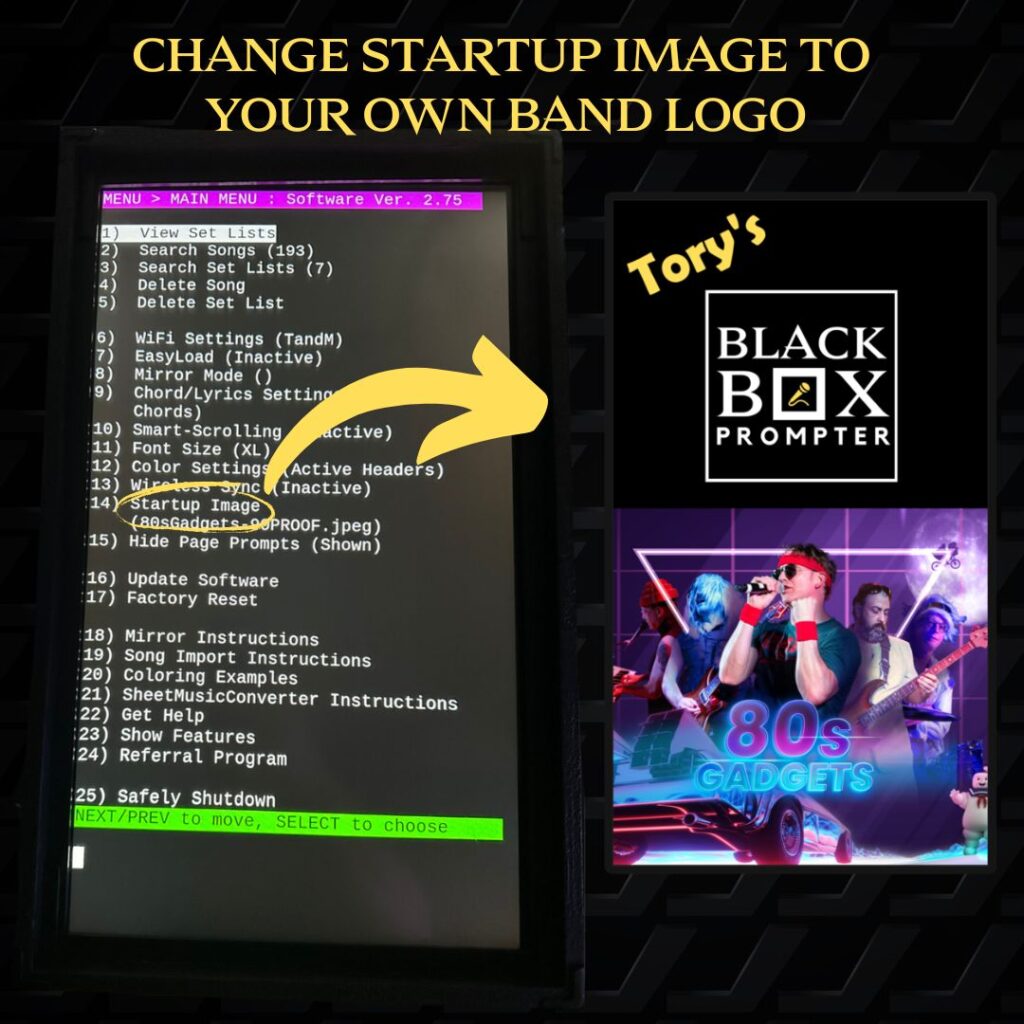
How to Change Startup Image
It’s easy to personalize the image that appears at startup:
1. Create your own image file with dimensions of 1080×1920 and save as either a .jpg, .jpeg, .png, or .pdf file.
2. Save it to your USB thumb drive, inside the ‘logos’ folder.
3. Properly eject your thumb drive and insert it into your prompter (will immediately start importing image file(s).
4. After rebooting, from Main Menu go to “Startup Image” and choose the image you’d like to display at startup/during breaks.
In all of your set lists, you’ll see your startup image as if it was a song. When you click on it, the image pops up immediately – this is intentional so you can easily retrieve this image which is helpful to show your band’s brand before a set or between sets).

How to Auto-Transpose Songs
With BLACK BOX Prompter you can quickly transpose your chords in a matter of seconds.
1. Open a song from EverySong or from a set list (only text-based songs are supported, not PDFs or images)
2. Double-tap middle SELECT key on foot pedal to go to Transpose Menu
3. Confirm the key the song is currently in. 4. Change to the desired key by pressing PREVIOUS or NEXT on foot pedal. Press SELECT to confirm.
How to Colorize Song Sections & Chords
Add color to your song sections (e.g. chorus, bridge), etc. Be sure to add the section in brackets on its own lines, e.g. [chorus].
Turn on your color preferences in Settings.
You can also choose the color of your Chords (also in Settings).
Watch video for step-by-step instructions.
All About SingAlong
Your audience can scan a QR code and see the lyrics that you have on the BLACK BOX Prompter. No app needed.!
Simple to set up:
- Save the QR code image via a system backup.
- Print it out and display to the audience.
- When you pull up a song from your set list on your prompter, members of the audience scan QR code with their smart phone and voila!
They instantly see the lyrics that are shown on your BLACK BOX Prompter.
When you go to the next song, they will appear!
We're Here For You If You Need Us...
Having trouble or something isn’t working just right? Visit the Support Page and tell us about it so we can fix it ASAP.

